
The Jobs page allows you to view all your jobs in a table format. Here you can use filters to find jobs with specific criteria like scheduled dates, add job field values to the table as columns, and export the table to the XLSX file.
Jobs are grouped by date in order from the latest to the earliest jobs.
Jobs without a scheduled date are placed at the very top of the list as Not scheduled.

The Jobs page
Filters
Filters are useful when you want to find jobs with a specific property. For example, you can find jobs completed for a specific client or by a specific assignee. You can filter jobs by assignee, status, template, scheduled date, finish date, client/site, and other fields, including most of the custom and report fields.
To find jobs with a specific client, use the Client / Site filter.
Select a client in the Client / Site filter and apply the filter. After that, Planado will show only jobs with the selected client or site. This way you can get a list of jobs completed for a selected client and send it to your client in the XLSX format.

The Client / Site filter
Other default filters allow you to filter jobs by other default job properties like assignee or scheduled date.
This way, you can look up jobs completed by a particular assignee in the selected period of time.

Jobs filtered by an assignee and a finished date
Use the Status and Scheduled at filters to locate jobs that are incomplete within the expected timeframe. In the Status filter, select Scheduled, Published, Started, Paused, and En route. For the Scheduled at filter, choose Earlier than and set it to Now.

Filters for the incomplete jobs
This will display a list of jobs scheduled before the current time that remain incomplete.
You can refine your search by specifying time using the "Earlier than" and "Later than" filters, enabling more accurate results. This is an optional parameter.

Time in the Scheduled at filter

Incomplete jobs
You can also add filters for custom and report fields. To add a filter, click on the filter settings button (⚙️) on the bottom left.

Open the filters settings
Filters settings will open. Here you can select custom and report field filters as well as some default fields like Job type Territory, and different durations filters.

Filters settings
Currently, you can add filters for the following field types:
- Text;
- Yes/No;
- Pick list;
- Barcode;
- Signature;
- Money;
- Number;
- Integer;
- Date;
- Date with time;
When you have selected the fields that you want to use as a filter, save the settings. After that, your selected filters will appear in the filters list.

Added filters
All fields except Yes/No type fields can be filtered for the Filled in or Any value property. This way you will see only jobs that have this field filled in.

Options in different field types filters
For some field types, you can specify what values you are looking for. This way you can search for jobs with a specific word in a comment field, for example.
- Text: a field contains part of the text

The specific value text filter
- Date and Date with time: filter jobs for a selected time period. Works the same way as the Scheduled at and the Finished at filters.

Date and time filter for a specific value
- Pick list: one or several values from a pick list

Pick list specific value filter
- Integer and number: you can filter fields with this field type for an exact value or for a value in a range. This way you can find jobs with approximate field values.

Number field filter for an in-range value
- Money, signature, and barcode fields have the Any value filter. It will show all jobs with the selected field filled in but not for an exact value. For example, this way you can find jobs that were signed.

Signature field any value filter
Table columns
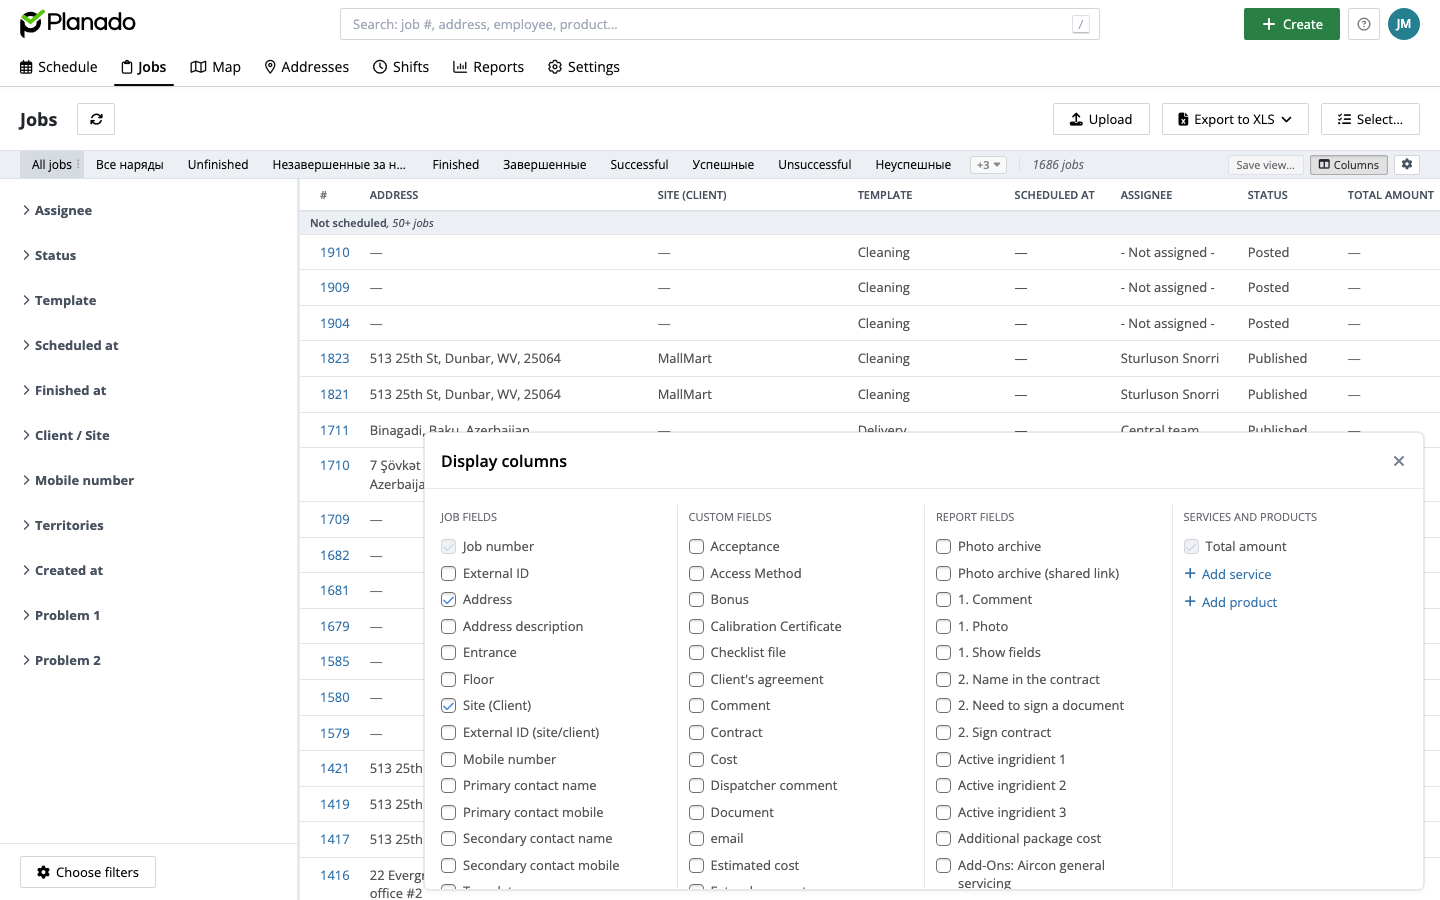
The table displays each job's data in columns. Click Columns above the table and select the fields you want to show. Columns in Custom fields and Report fields come from job templates: add a field to a template to make it available as a column.
Reorder and resize columns
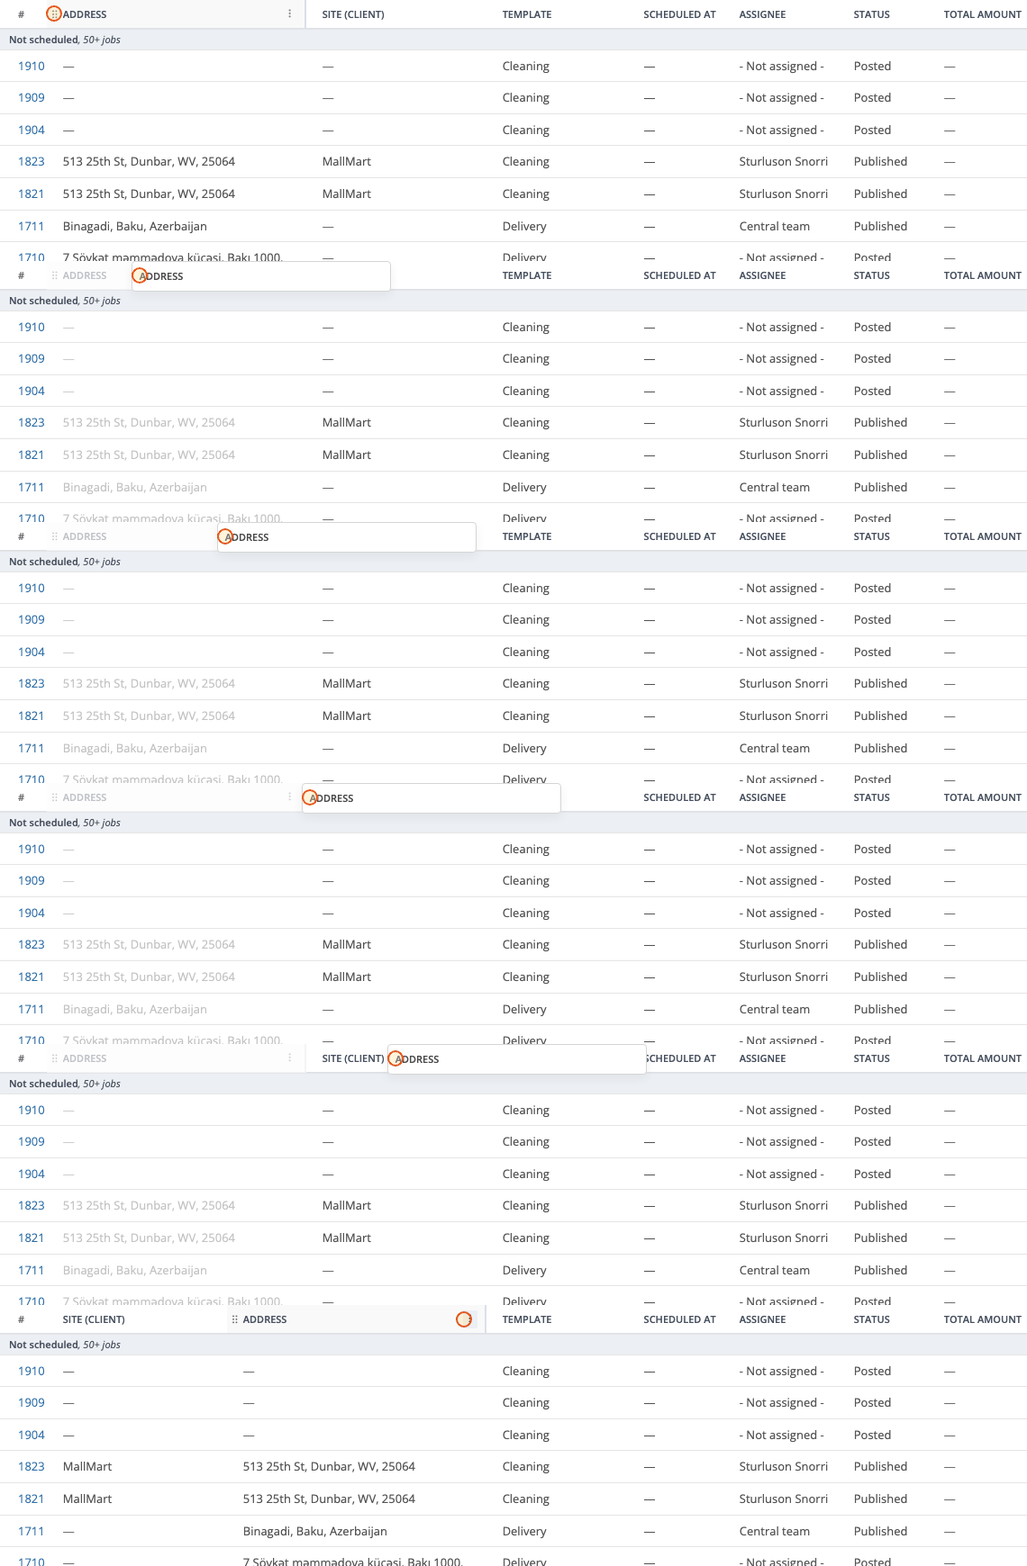
To move a column, press and hold its header, then drag it to the position you want. The # column stays fixed at the beginning.
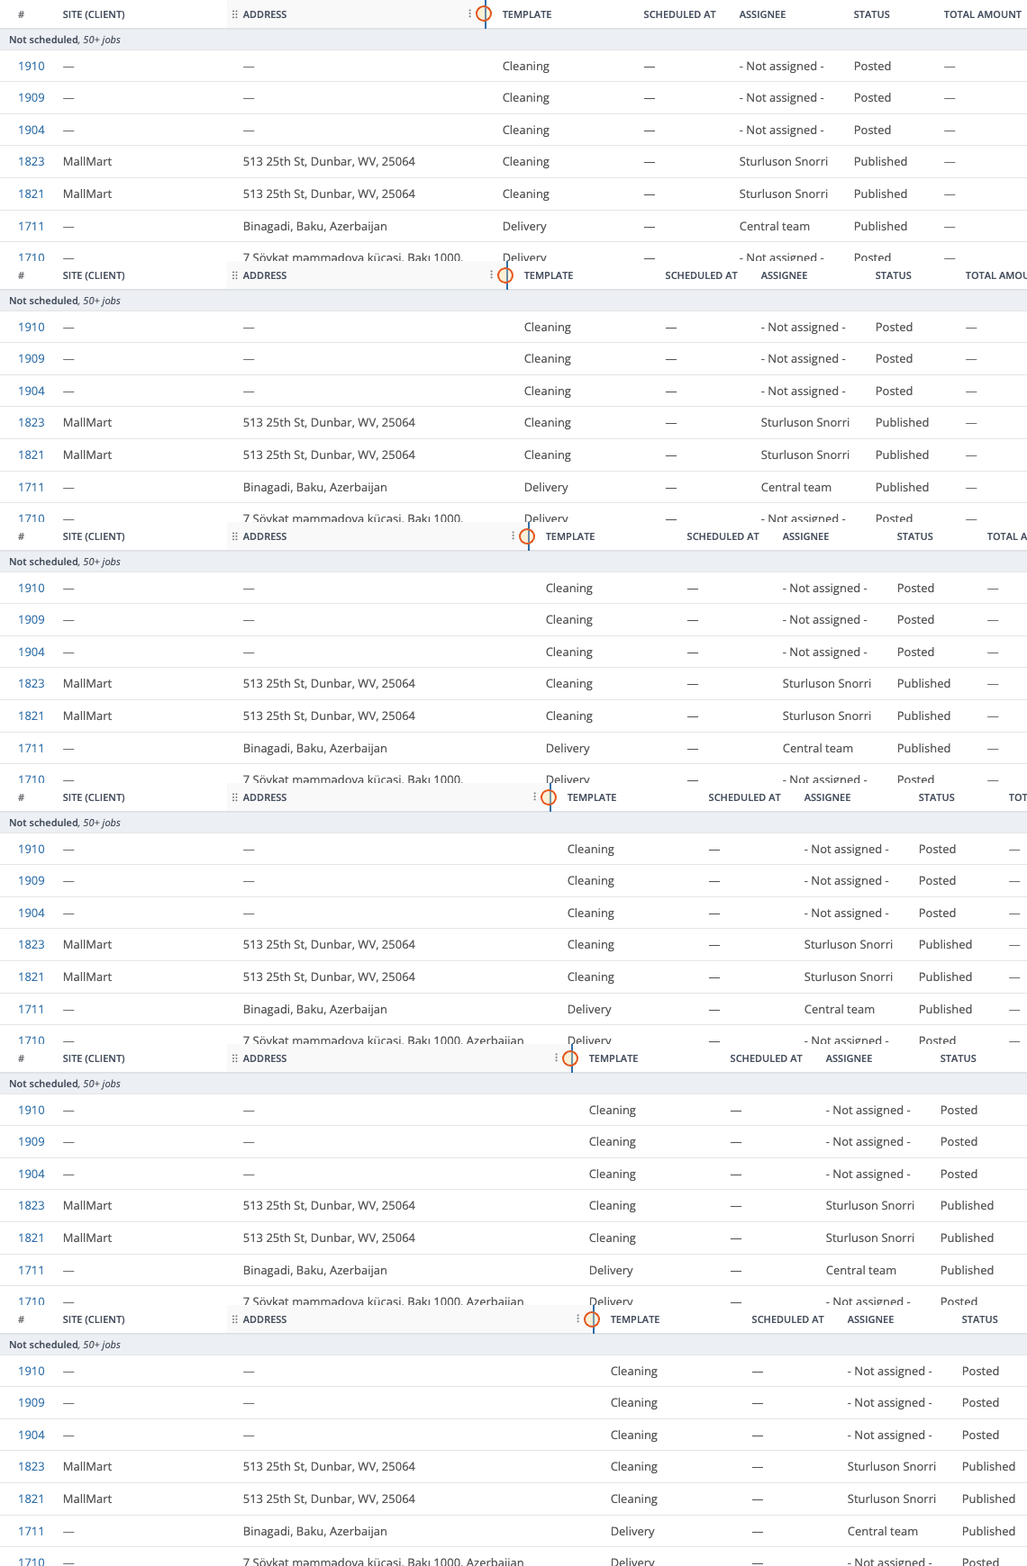
To resize a column, move the pointer to the edge of its header, hold the mouse button and drag the edge to the left or right.
Column order and width are saved with the view. After making changes, click Save view… and choose where to save them.
Saved views
A view stores your jobs list settings: filters, the displayed columns, their order and width. Create views for different tasks and share them with colleagues.
Save a view
- Set the filters and choose your columns using Columns above the table. Adjust their order and width if needed.
- Click Save view….
- To create a separate view, select New view and enter its name. To update an existing view, select it from the list of views you can edit.
- Click Save. The new view appears in the bar above the jobs list. Click its name to apply its settings.
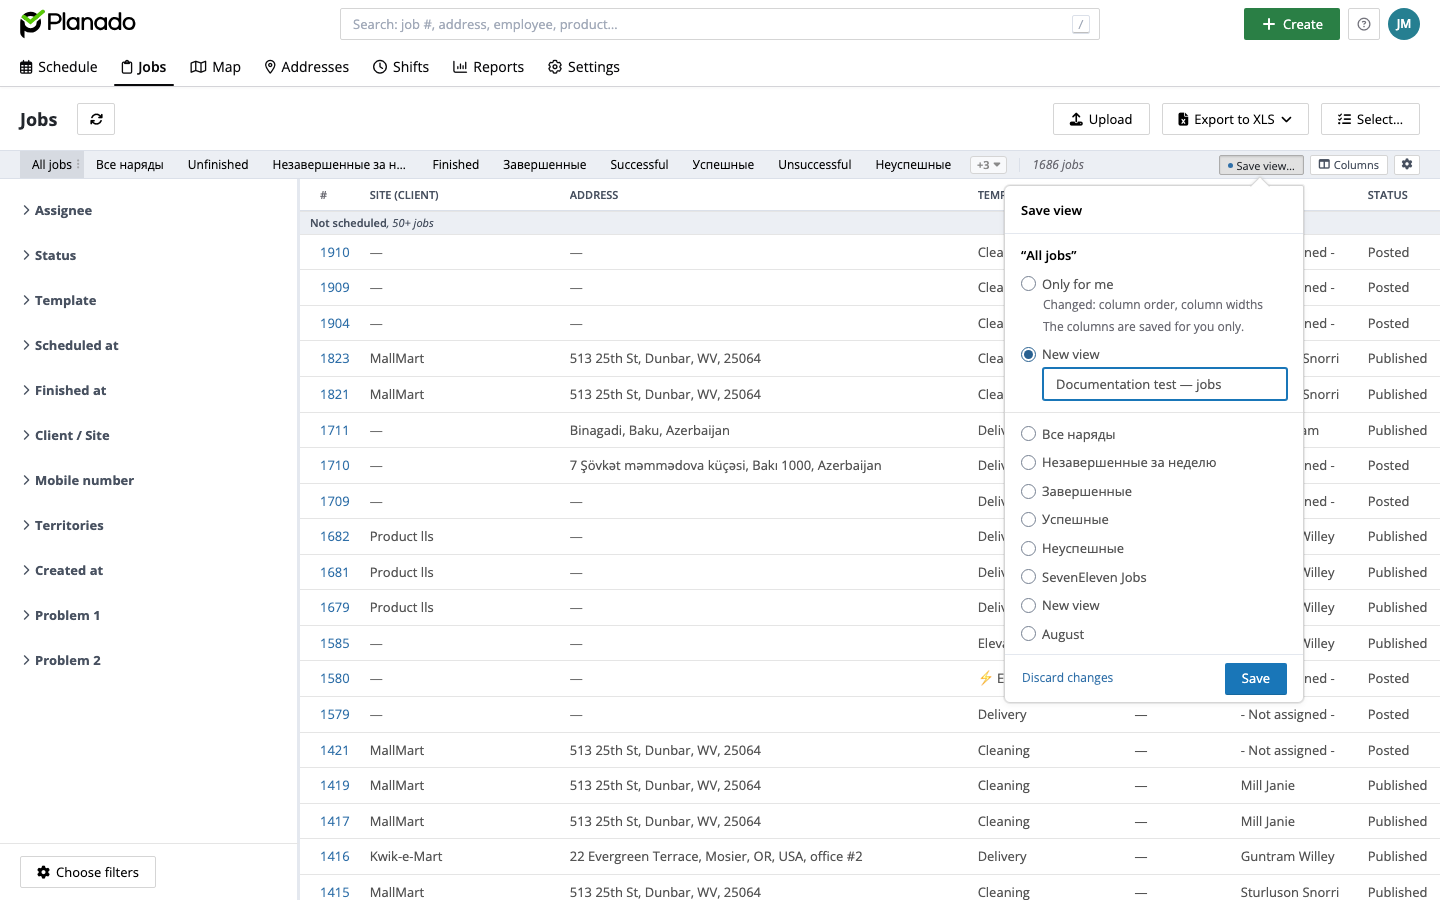
When changing the columns of a standard view, you may also see Only for me. This option saves the column settings for you only.
Share a view
- Click the View settings gear above the list, on the right.
- Find the view and click Share in its row.
- Choose an audience:
- Only me — a private view available only to you.
- Selected people, groups and business units — select recipients. Use the search field to find them. Groups and business units are available when your company uses them.
- Everyone in the company — share with all employees. This option requires the Shared views permission.
- Click Save in the sharing dialog.
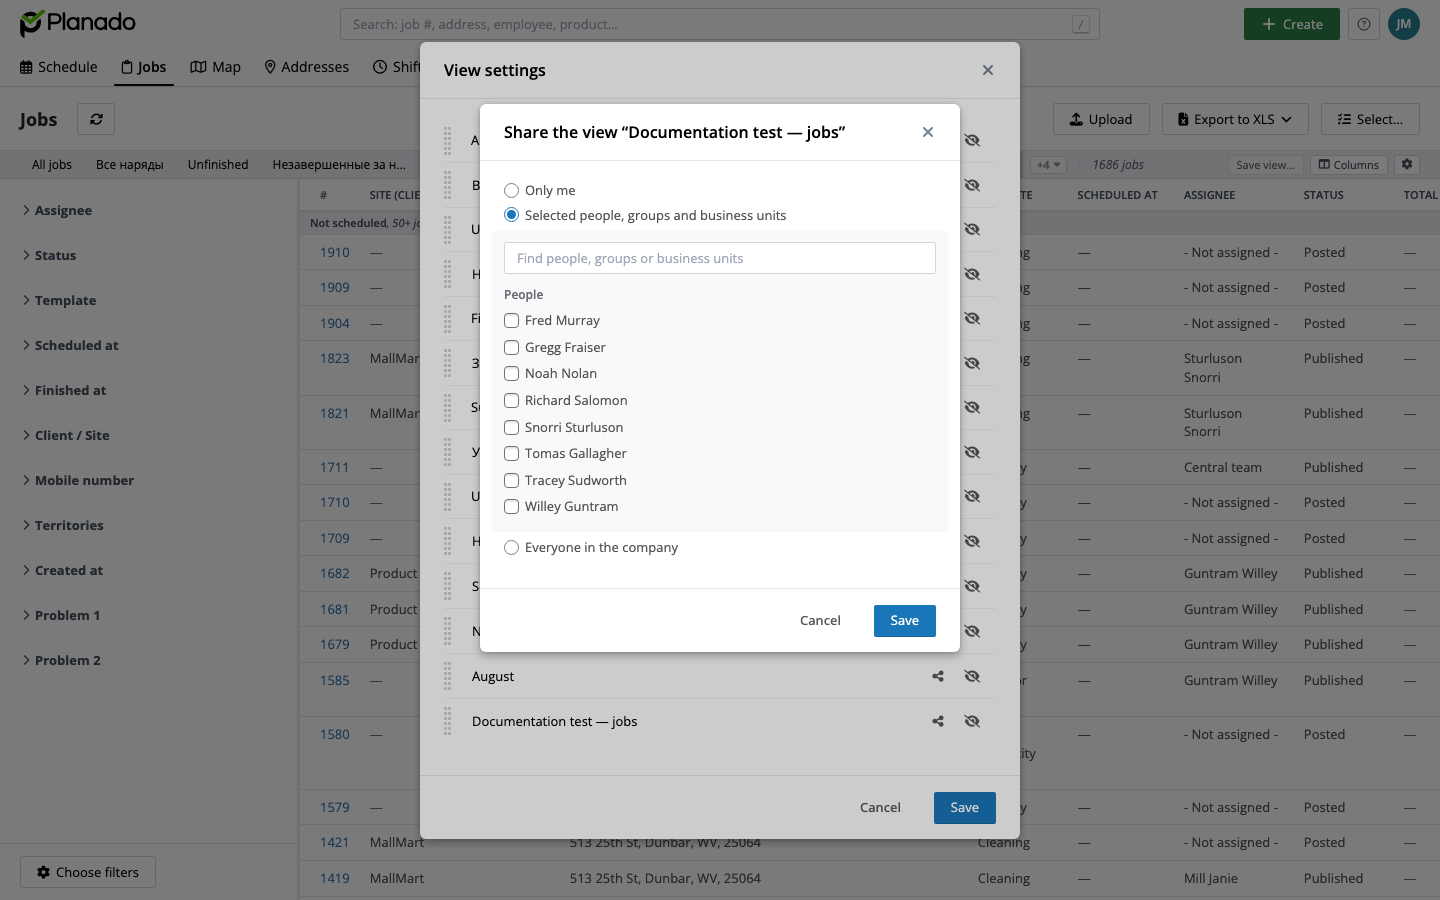
The shared view appears in recipients' view bars. A view shared with a group is available to its members. Hover over a view's name to see its owner in the tooltip.
To stop sharing, select Only me and save. The view disappears from former recipients' bars. If you switch back to Selected people, groups and business units, the previously selected recipients are kept.
Sharing a view shares the list settings. Each employee's access to the jobs themselves still follows their permissions.
Rename, reorder, hide or delete a view
Open View settings. You can:
- Rename: click the view's name with the pencil icon, enter a new name and confirm it.
- Reorder: hold the handle to the left of the name and drag the row.
- Hide: click the crossed-out eye. The view disappears from your bar without removing it for colleagues. To bring it back, open settings and enable it again.
- Delete: click the trash icon for a view you can edit. Deleting a shared view removes it for all recipients.
Click Save at the bottom of the dialog to keep your changes.
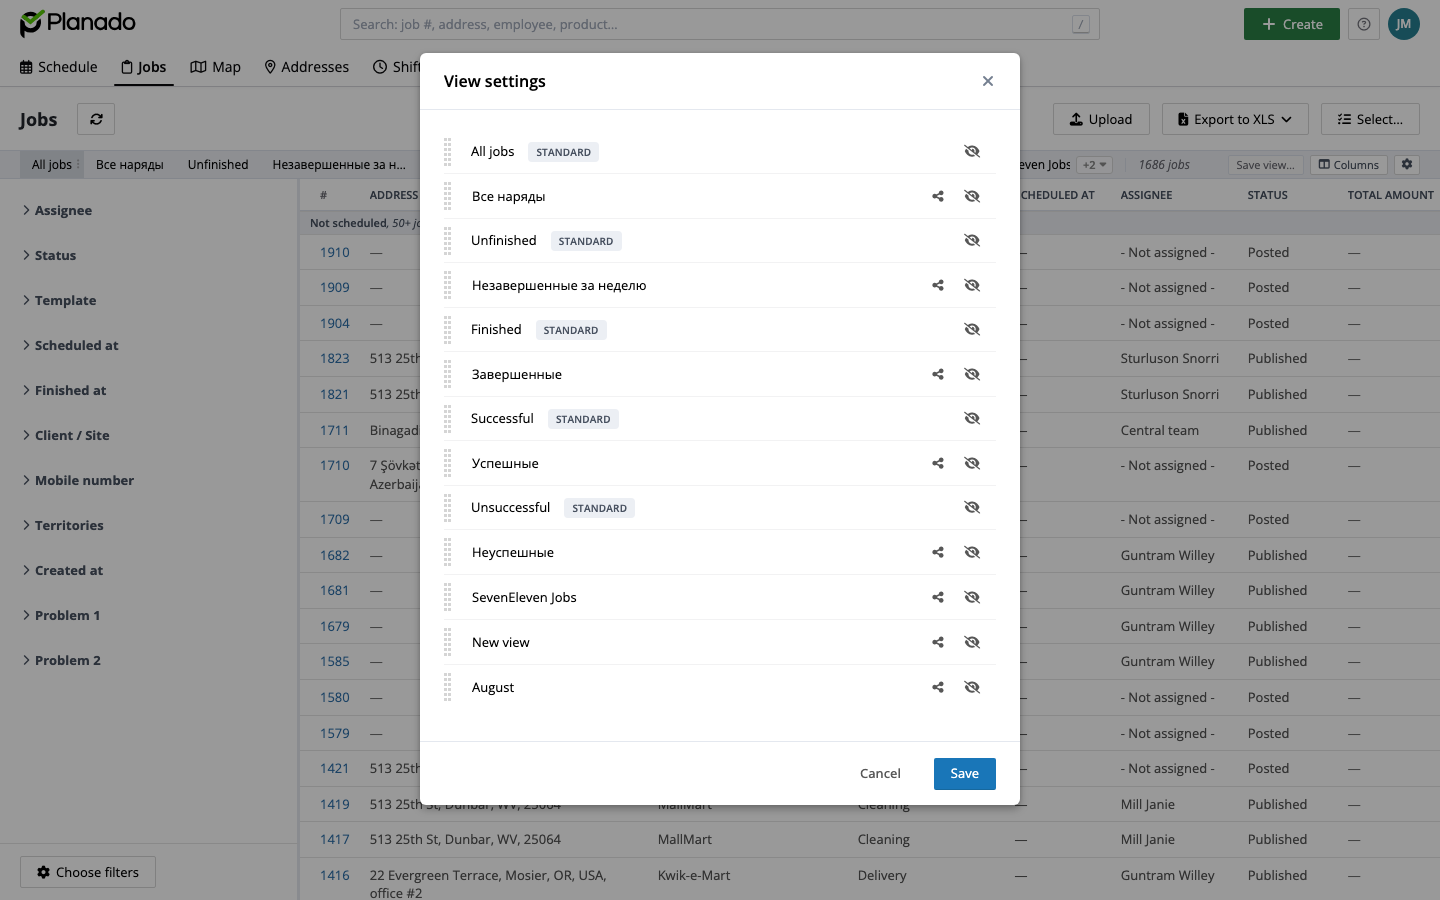
Renaming, editing and deleting depend on your permission to edit the view. If a colleague shares a view with you, you can apply it; without editing permission, you cannot change, delete or share it further.
Make your own copy of someone else's view
Select the view in the bar and open the ⋮ menu next to its name. Click Make a copy. A private copy is created immediately, with “(copy)” added to its name. Rename it in settings and adjust its filters or columns for your task.
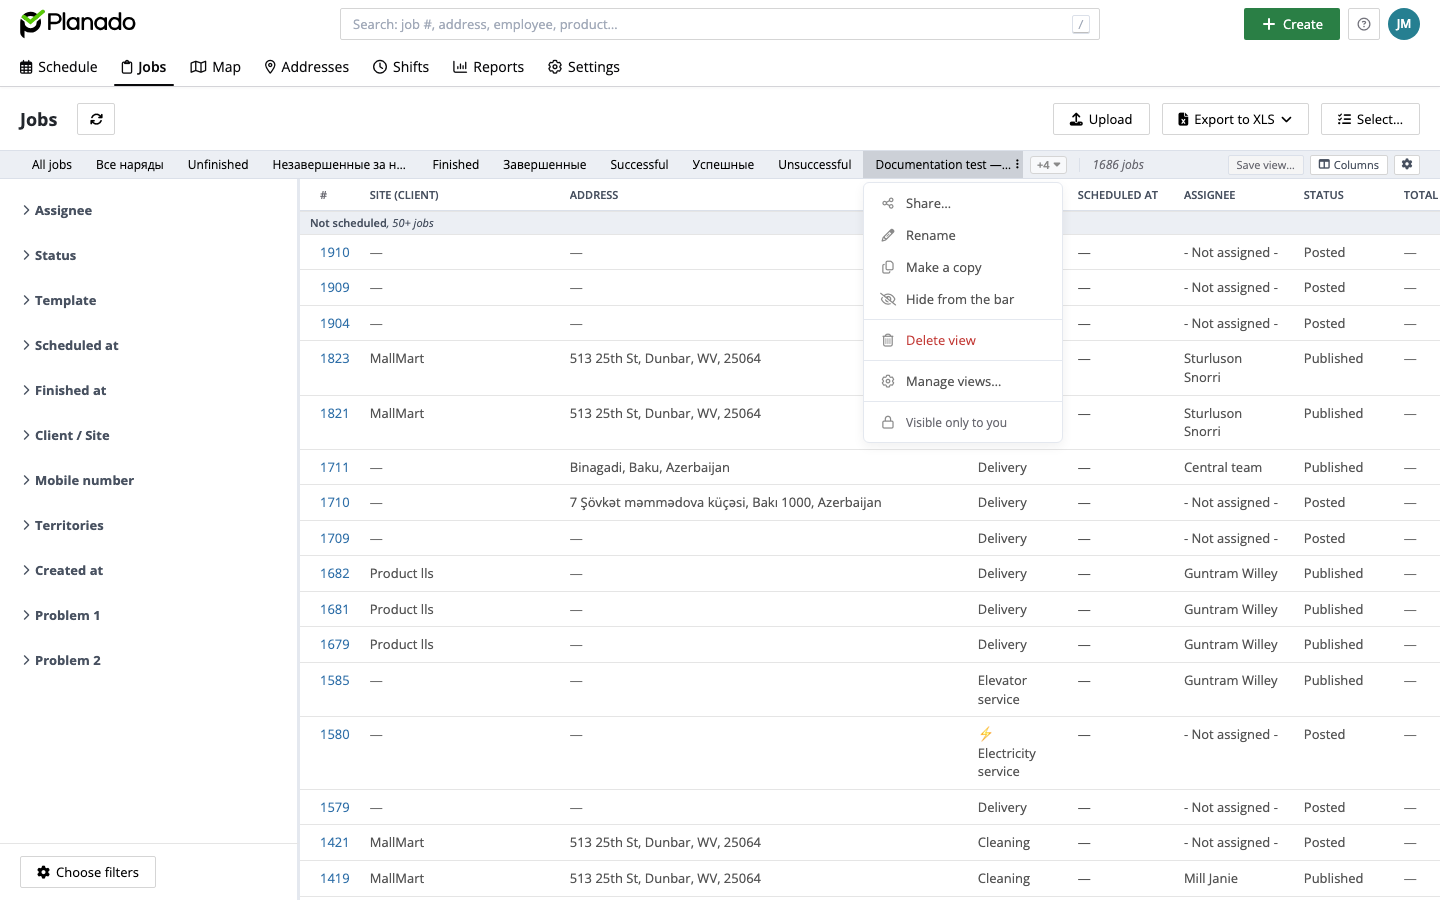
Shared views for administrators
The Shared views permission gives access to Settings → Shared views. The Administrator role has this permission; it can also be added to a custom role.
The page lists shared views with their owners, audience and recipient count. An administrator can open a view, assign another owner or delete it. Other users' private views are not shown.
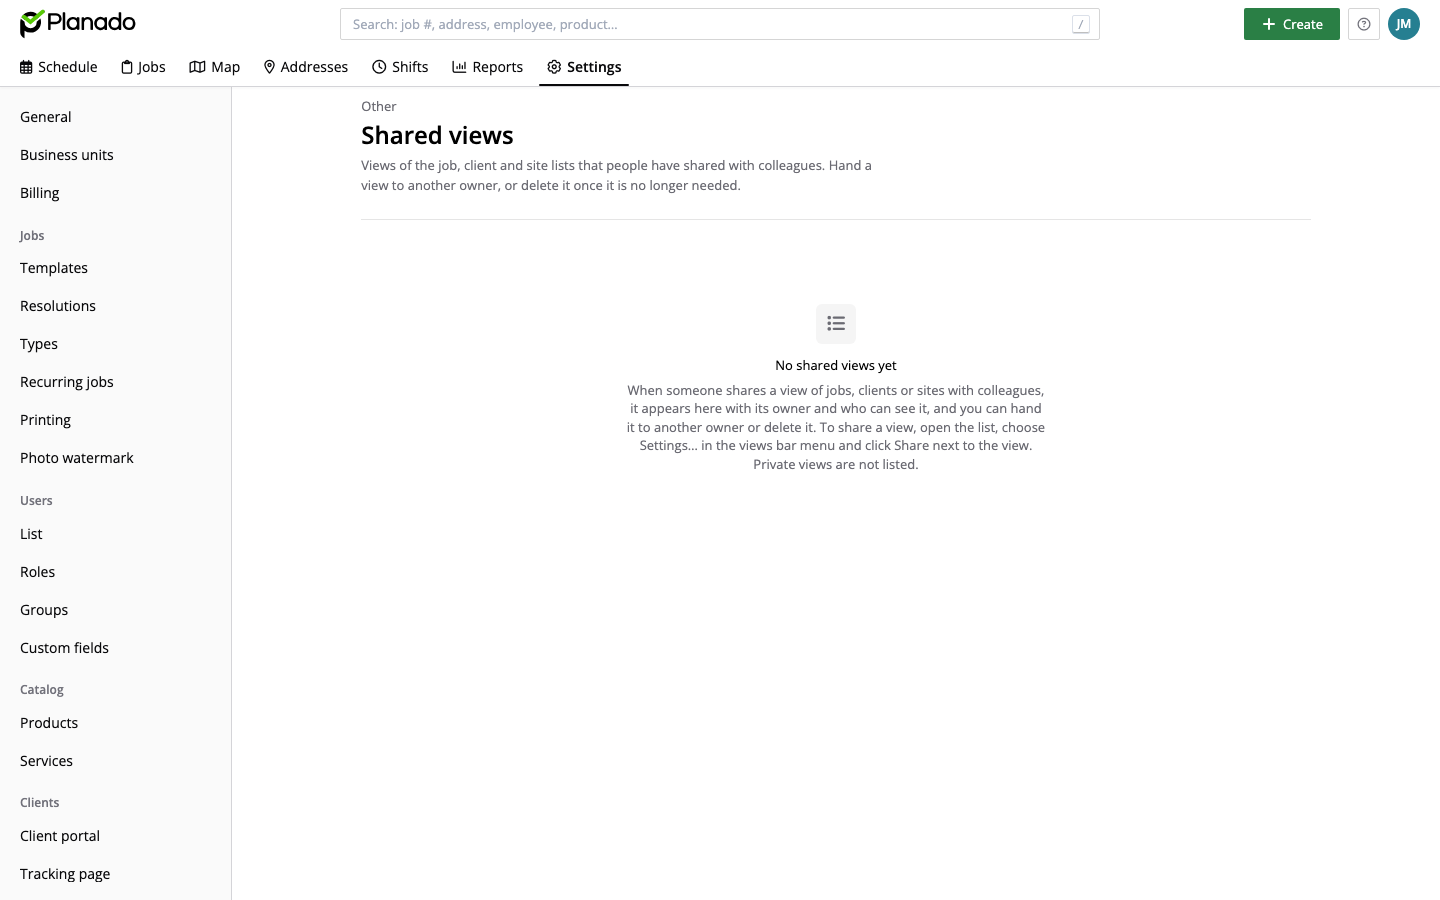
The permission also allows editing and sharing any shared view, including sharing it with the whole company. Only a user with this permission can manage the sharing settings of a company-wide view, even if another employee owns it.
Reassigning and deleting on the Shared views page also require permission to view jobs. If a view is not shared with the administrator, opening it may show a notice that the view is unavailable.
When an employee is removed, their shared views keep working and their owner is shown as removed. Deleting a group stops access through that group; restoring it restores that access.
Standard views
All jobs — the default view for all jobs without any filters.
Unfinished - shows unfinished jobs for the current week.
Finished - shows all Completed jobs.
Successful - shows all jobs Completed with a successful resolution.
Unsuccessful - shows all jobs Completed with an unsuccessful resolution.
Exporting jobs to an XLSX file
You can export jobs data to the Excel file. This will help you can create your own reports and data analysis.
To export jobs, select the columns and filters that you want your file to have, click the Export to XLS button, and select Export the currently displayed columns. After that, an XLSX file will start forming. When it is done, you can download your XLSX file. It will have all the data that was displayed in your jobs table

Export displayed columns
If you want to export jobs with all columns, just select the Export with all job fields option. In this case, the file will have all the default job fields.
If you export an XLSX file with the Export witt all job fields option, your custom and report fields will not show up in the result file. It will only have all default fields.
You can start several different exports at once. They will be performed in the start order. The process and the results you will be able to find in the operations tab on the bottom right.

Two exports running at once
You can export up to 100000 jobs in one export.
If you need any help, leave us a ticket or write to our email address: support@planado.app.